foxwell diagnosis tool
obd2,ecu, diagnosis tool free downloadfoxwell diagnosis tool
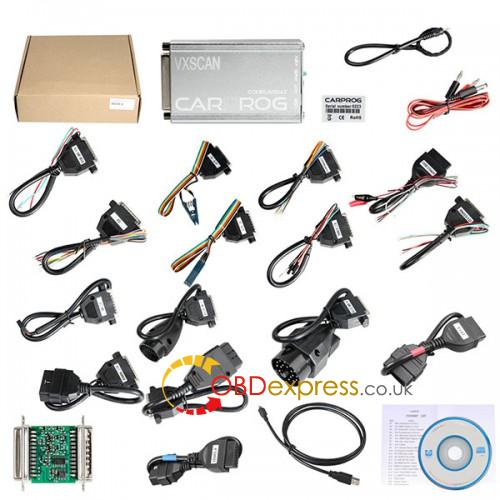
obd2,ecu, diagnosis tool free downloadرایگان دانلود CARPROG FW 8.21 SW 9.31، 10.93 (مگا، بدون گذر)
obdexpress.co.uk مهندس ارائه می دهد از لینک مگا رایگان نرم افزار CARPROG 9.31 و 10.93. و همچنین راهنمای نصب و گزارش تست.
نرم افزار CARPROG 9.31 دانلود رایگان:
https://mega.nz/#!oQRyiYwS!nYR2BGzKesgz0spuRYfr5wQFSABLpCO8v7zB7rhXbrY
NO PASS
نرم افزار CARPROG 10.93 دانلود رایگان:
https://mega.nz/#!pIggmQ7C!K0TwZSL23IDEqRCjBB8Qvg3BfQzQ95hulJXTqdLffcU
NO PASS
هر دو 9.31 و 10.93 سازگار با CARPROG سیستم عامل 8.21 رابط .
راهنمای نصب:
چگونه به نصب CARPROG V10.93 به Win 7؟
چگونه به نصب CARPROG V10.05 به Win 7؟
چگونه به نصب نرم افزار CARPROG v8.21 کامل
CARPROG کلون بررسی:
همه چیز درباره کلون CARPROG
https://mhhauto.com/Thread-All-About-Carprog-Clone؟page=6&highlight=carprog
درباره نتایج آزمون، و همچنین پرسش و پاسخ.
ahttp://blog.obdexpress.co.uk/2019/03/29/free-download-carprog-fw-8-21-sw-9-31-10-93/
Foxwell NT650 service reset tool registration and update guide
How to register and update Foxwell NT650 service reset tool and OBD2 code scanner in step by step procedure, incl. words & images as well as YouTube video.
Procedure:
Plug the USB cable into the Foxwell NT650 and another end to the computer.
The machine turn on and have menu options (OBDII and 12 types of service reset functions).


Choose "Application /setup", then "About", you can check the machine serial number, take a picture of it.
 7
7

Unplug the USB cable, take off the SD card, plug the SD card into the card reader.
Plug the card reader into the computer.


Browse the www.foxwelltech.com.
Click on "Product", then "Foxwell NT650", then "Download", then install "Foxscanner Installer _8.71_20190124.zip".


Begin to install " Foxscanner Installer" until it finishes.


Open Foxscanner 8.71 and then register until it prompts registration is done, don't forget to confirm your email address in your email.


Next is to update Foxwell NT650.
Login Foxscanner 8.71 with your name and password.
Get message "No serial number associated with the user", then choose "Register Products", then input the Serial Number" and password, summit and get message "Serial Numbers registered successfully".


Back to "My updates" and you can see the available updates.
You can choose all models or one simple model to update.


Youtube video:
[embed]https://www.youtube.com/embed/goBBoFNFjiI[/embed]
how to Register and Update Foxwell NT650 service reset tool & OBD2 code reader.
That's all.
Thanks
How does Foxwell NT650 reset Porsche Cayenne ABS /SRS light?
Porsche Cayenne has Airbag light on, I will use Foxwell NT650 to see what's going wrong with the airbag light on and try to reset it, the job is done perfectly. Next is to perform Steering Angle sensor (SAS) Calibration" with Foxwell NT650


Select "ABS /SRS".

European.

Porsche.
Loading data, please wait......


For this one, it only gives "Manual selection". So we have:
Cayenne (9PA up to MY 2010)
Cayenne (92A from MY 2011)
Boxster (987)
Cayma/ Boxster (986)
Boxster /Cayman (981)
Cayman (987)
911 (997)
911 (996)
The first one " Cayenne (9PA up to MY 2010)" is what I need.


Diagnosis -> Control units -> Airbag ->Mode Menu.


We are going to read codes, let's see what's wrong with it, that's two codes:
1316: PSM control module
2511: AWS control module


We are going to go back and select "Control Units", and then "PSM", and if we can check this code as well, and get "DTC : 778 Steering angle sensor"


Next is perform "Steering Angle sensor (SAS) Calibration" with Foxwell NT650.
Choose the vehicle
Europe.
Go to "Porsche".
Cayenne (Up to 2010)
Switch on ignition.
Steering Angle Sensor calibration "Info, Important, Safety note"
Calibration Succeed.


Finally, the ABS and SRS light go away.

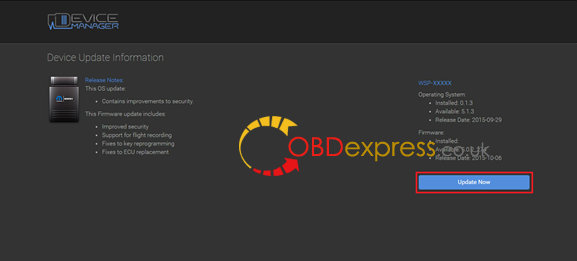
wiTECH MicroPod دوم آموزش 2 راه اندازی
ی microPOD جدید و شما می خواهم برای تبدیل microPOD موجود خود را با استفاده از با wiTECH 2.0 سیستم، شما نیاز به دانلود و نصب ابزار راه اندازی microPOD برای پیکربندی / راه اندازی microPOD خود را برای wiTECH 2.0 .
توجه: microPODs با شماره سریال آن با "برنامه جهانی غذا" باید با این ابزار استفاده شود.
روش
اگر شما یک شبکه محدود شده، شما باید اول مطمئن شوید که تمام سایت های ذکر شده در زیر را قادر به قادر به موفقیت استفاده microPOD ابزار راه اندازی و سیستم wiTECH 2.0.
mixpanel.com
bugsnag.com
fcawitech.com
chrysler.com
dealerconnect.com
jeep.com
witechsystem.com
http://fonts.googleapis.com/css؟family=Roboto:400،300
توجه: لطفا هر گونه نرم افزار آنتی ویروس که شما بر روی کامپیوتر خود را به منظور اجازه می دهد راه اندازی سودمند microPOD برای نصب و اجرای صحیح غیر فعال کنید.
چگونه برای دانلود و نصب ابزار راه اندازی microPOD
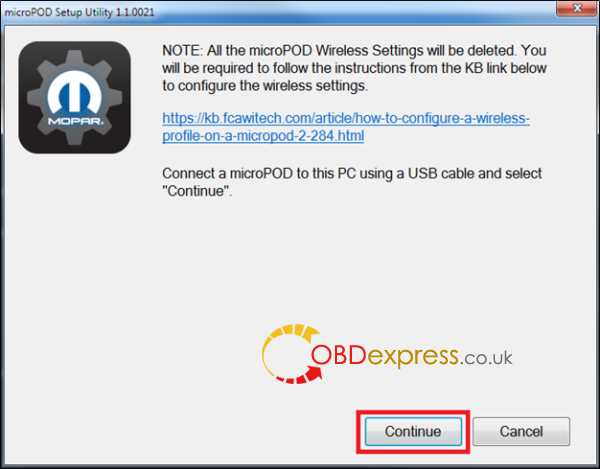
مهم: هنگامی که microPOD با استفاده از ابزار راه اندازی microPOD پیکربندی شده است، تمام تنظیمات بی سیم microPOD حذف خواهد شد. شما باید به دنبال دستورالعمل از لینک KB با عنوان "چگونه برای پیکربندی یک مشخصات بی سیم در microPOD II".
برای دانلود نرم افزار، لطفا ورود به DealerCONNECT> خدمات> wiTECH اطلاعات> microPod ابزار راه اندازی
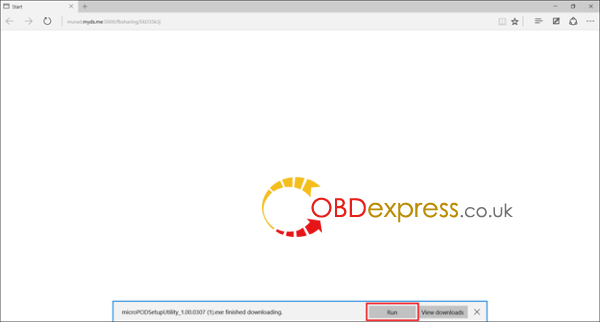
مرحله 1
در "اجرای" را کلیک کنید برای آغاز فرایند دانلود microPOD ابزار راه اندازی.
گام 2
جادوگر نصب ظاهر خواهد شد به نصب wiTECH X64 درایور بر روی کامپیوتر شما اگر کامپیوتر شما شده است با wiTECH 1.0 نرم افزار نصب نشده است.
اگر کامپیوتر شده است با wiTECH 1.0 نرم افزار نصب شده، شما نمی خواهد به صفحه زیر را مشاهده کنید و به مرحله 6. در غیر این صورت، بر روی "بعدی" را ادامه دهید.

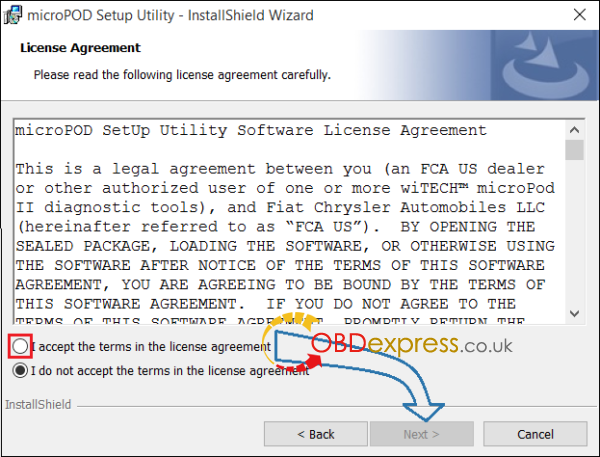
مرحله 3
License Agreement را مطالعه دقت و شرایط قرارداد مجوز را می پذیرند. سپس بر روی دکمه "بعدی" را ادامه خواهد داد.
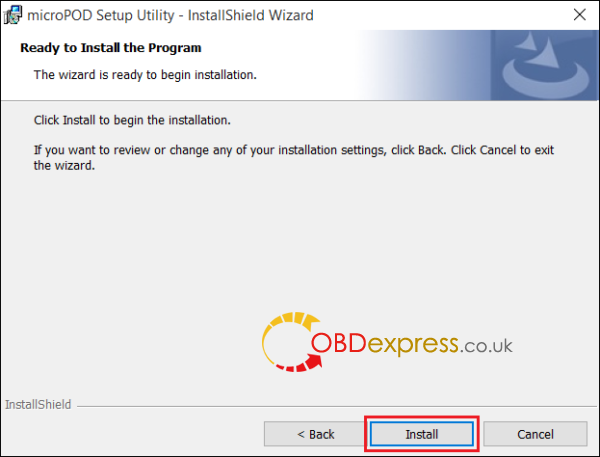
گام 4
شما در حال حاضر آماده برای شروع نصب واقعی از راننده. شما هم اکنون می نیاز به کلیک بر برای آن را به شروع "نصب".
مرحله 5
این در حال حاضر خواهد X64 درایور wiTECH نصب کنید. پس از کامل، برنامه به طور خودکار به مرحله بعدی بروید.
مرحله 6
پس از نصب به اتمام رسانده است، با کلیک بر روی "پایان". اقدام به بخش زیر، "استفاده از راه اندازی microPOD سیستم های مهندسی".
با استفاده از ابزار راه اندازی microPOD
توجه: لطفا مطمئن شوید که کامپیوتر شما به اینترنت متصل و microPOD به کامپیوتر از طریق USB قبل از شروع این فرایند متصل می شود. این نرم افزار به شما کمک خواهد پیکربندی microPOD خود را برای wiTECH 2.0.
مرحله 1
شروع microPOD ابزار راه اندازی با کلیک کردن بر روی آیکون بر روی دسکتاپ:
![]()
اگر ابزار راه اندازی microPOD که نصب شده است از تاریخ، به شما خواهد شد مجبور به روز رسانی به نسخه جدیدتر از نرم افزار.
گام 2
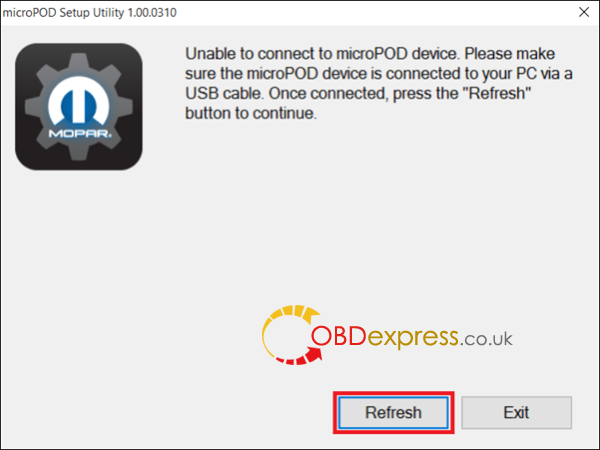
لطفا مطمئن شوید که microPOD شما به کامپیوتر از طریق USB متصل می شود.
2A گام
اگر صفحه زیر ممکن است شما به اینترنت متصل نیست می بینید، و یا یک فایروال است که بلوک های 1 یا بیشتر از این وب سایت است.

انتخاب کنید "ادامه" در صفحه بعدی برای wiTECH 2.0 دستگاه نصب و پیکربندی.
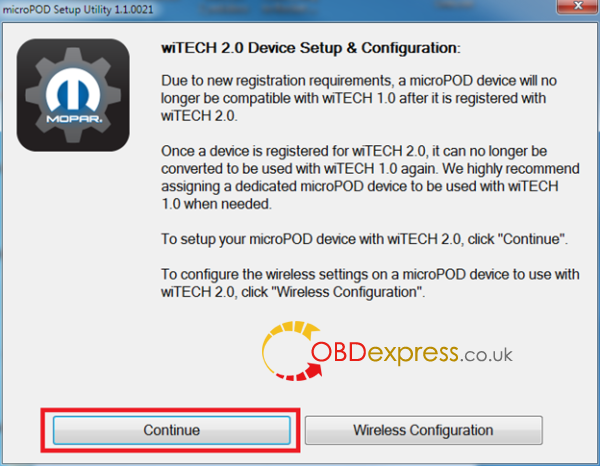
توجه: اگر شما فقط می خواهید برای پیکربندی تنظیمات بی سیم در یک دستگاه microPod برای استفاده با wiTECH 2.0، بر روی "تنظیمات بی سیم" و به دنبال دستورالعمل.
انتخاب کنید "ادامه" در صفحه بعدی به آغاز تلاش برای اتصال به دستگاه microPOD.
مرحله 3
هنگامی که خود را microPOD II است توسط ابزار به رسمیت شناخته شده، را انتخاب کنید "ادامه" به ادامه با پیکربندی.

توجه: microPODs با شماره سریال آن با "برنامه جهانی غذا" باید با این ابزار استفاده شود.
3A گام
اگر ابزار کند و دستگاه microPOD پیدا کنید، لطفا اطمینان می دهم که microPOD از طریق USB وصل کنید و با کلیک "تازه کردن".
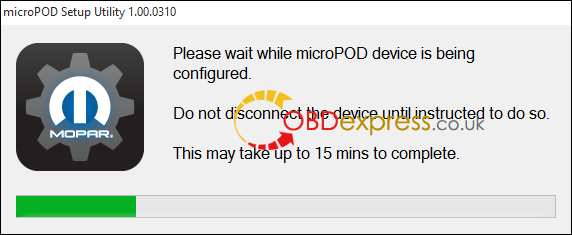
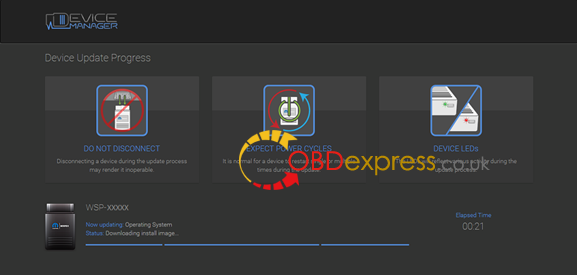
مرحله 5
صفحه زیر برای تا 15 دقیقه به نظر می رسد در حالی که دستگاه microPOD است که پیکربندی شده است.
مرحله 6
صفحه زیر ظاهر خواهد شد که ابزار تکمیل پیکربندی microPOD برای wiTECH 2.0 برنامه.
توجه: پس از microPOD ابزار راه اندازی فرار است، تمام شبکه های بی سیم موجود خواهد شد از microPOD حذف.
مهم! ترک microPod راه اندازی پنجره سودمند در حال اجرا به شما مورد نیاز خواهد شد به روز رسانی نرم افزار کامل به دستگاه microPod قبل از پیکربندی های بی سیم.
مراحل 6a
ورود به wiTECH 2.0. microPOD دوم که فقط با استفاده از ابزار راه اندازی microPOD باید در wiTECH 2.0 کشف به نظر می رسد پیکربندی شده است. شما نیاز به به روز رسانی سیستم عامل از خود microPOD دوم قبل از آن را می توان با wiTECH 2.0 استفاده می شود. کلیک کنید "ادامه"، و مرورگر وب خود را شما را به صفحه تغییر مسیر خواهد شد به دانلود و نصب به روز رسانی سیستم عامل که در مرحله زیر دیده می شود.
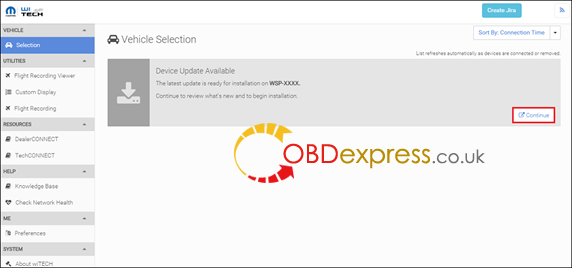
* توجه: اگر microPOD دوم نشان نمی دهد تا در کشف بعد از چند دقیقه لطفا چرخه قدرت خود را microPOD دوم بکشید و دوباره آن را متصل.
مرحله 7
کلیک کنید "بروز کن" و خود را microPOD II باید به صفحه نمایش به روز رسانی ادامه خواهد داد. هنگامی که به روز رسانی، انجام خود را microPOD دوم قطع نمی در هر نقطه تا به روز رسانی کامل است.
* توجه: این می تواند بیش از 9 دقیقه طول می کشد. این فعالیت طبیعی برای microPOD دوم به راه اندازی مجدد است.
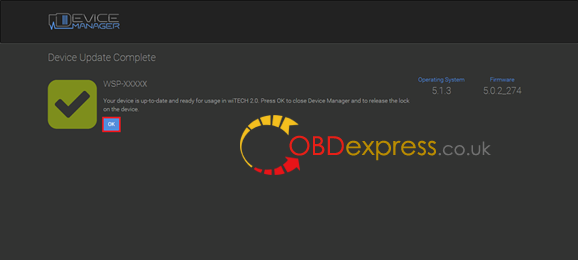
مرحله 8
کلیک کنید "OK" و به شما خواهد شد به صفحه wiTECH 2.0 کشف پیمایش. microPOD دوم شما باید ظاهر شود به روز شده و آماده استفاده است.
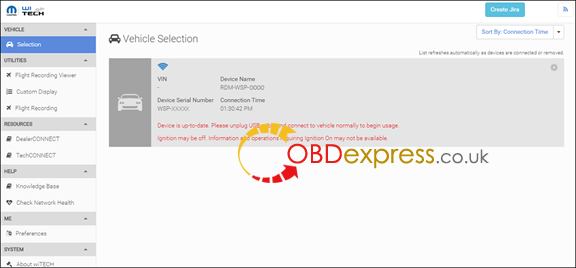
مرحله 9
با راه اندازی سودمند microPod هنوز در حال اجرا، پیکربندی بی سیم بر روی دستگاه wiTECH microPod 2.
لذت بردن!
http://blog.obdexpress.co.uk/2019/03/26/witech-micropod-ii-2-setup-instruction/
How to use Foxwell NT650 for Service and Maintenance?
This post gives brief instructions of the most commonly required service and maintenance operations in Foxwell NT650. Typical service operation screens are a series of menu driven executive commands. Follow on-screen instructions to complete the operation.
Available service and maintenance options include:
Oil Service Reset
Electronic Parking Brake (EPB)
Battery Replacement (BRT)
DPF Regeneration
Throttle Body Alignment (TBA/TPS)
Steering Angle Sensor (SAS) Calibration
Tire Pressure Monitoring System (TPMS) Programming
Gear Learning
CVT
ODOMETER
INJECTOR CODING

- Oil Service Reset
Oil Light Reset menu allows you to reset the service lamps on the instrument cluster. The
Service Indicator System is designed to alert the driver when the vehicle is due for a service.
Oil service reset methods are determined by the vehicle being tested. Depending on the vehicle being tested, any of the following means displays:
Oil Reset With One Button
Manual Reset
Auto Reset
1.1 Oil Reset With One Button
Oil Reset With One Button is applicable to GM models only. It offers quick and simple oil service reset with the click of one button.
To do Oil Reset With One Button:
1). Scroll with up and down arrow keys to highlight Oil Reset With One Button from the Oil Reset menu. An Information screen displays. Press the function key OK to continue or Cancel key to return to the Oil Reset menu.

2). Follow on-screen instruction and send a command to reset oil service. A screen with “Success”
message displays once the lamp has been reset. Press any key to return.

3). If the oil service reset failed, the following screen displays. Please follow on-screen instructions to troubleshoot it. If the problem still exists, please contact your local dealer for assistant.

1.2 Manual Reset
Almost all Asian vehicles and most American and European vehicles have mechanical oil service indicator reset. The service tool does not have to communicate with the vehicle being tested, but guides you to complete the service manually by providing step-by-step on-screen instructions.
When Manual Reset is selected and the vehicle being tested identified, a procedure opens on the screen. Scroll with arrow keys to read the entire procedure and performing the necessary steps as directed by the on-screen instructions. The exact order of the test operation steps may vary depending on the test vehicle. Be sure to follow all on-screen instructions.
This manual reset procedure can be interrupted and aborted if the ignition key position is changed.
To do oil reset manually:
- Scroll with up and down arrow keys to highlight Manual Reset from the Oil Reset menu and press ENTER to confirm.

- Enter vehicle information by certain VIN characters, such as model, and year to identify the vehicle being tested and press ENTER key to confirm.

- When the vehicle is identified, a procedure screen displays.

- Follow all on-screen instructions to perform the manual mechanical reset.
- Press function key OK to return.
1.3. Auto Reset
Auto Reset is a bi-directional communication procedure directed by the service tool. The service tool displays guides for you through the process. A number of instructions that require a response to continue display, including an option to clear any stored codes once the interval has been reset. Follow the on-screen instructions.
- Electronic Parking Brake
EPB Service menu allows you to perform the service and maintenance of brake systems, including deactivation and activation of the brake control system, bleeding brake fluid, opening and closing brake pads, and setting brakes after disc or pad replacement, on multiple brands of vehicles where electronic brake systems are fitted.
Some tests display a command to the operator. For example, if “Pressing Brake Pedal” displays, the operator has to press and hold the brake pedal and then continue. Actual tests vary by vehicle manufacturer, year, make.
Typical special test options include:
Deactivate/Activate SBC/EPB systems -allows to deactivate brakes for further service or maintenance work on brake systems or activate brakes when service or maintenance work on brake systems are completed.
Adaptation on Audi A8 -allows to set new pad thickness of rear brakes calipers after changing brake discs & pads on Audi A8 models.
Replace hydraulic brake systems fluid/bleedbrake system on MercedesSBC vehicles allows to change brake fluid/bleed brake system.
Perform service reset and service position on BMW EPB vehicles -allows to do the CBS reset and CBS correction for front brake and rear brake.
Perform activation/service work on Volvo PBM vehicles -allows to perform installation check, applying parking brake, releasing parking brake, activating service mode and exiting service mode.
Reset memory on Toyota EPB vehicles -allows to clear the learned memory of the EPB ECU.
Perform brake cable replacement and electric parking brake replacement -allows to fit in or remove the brake cable safely, adjust brake cable’s tension and calibrate the electric parking brake replacement.
Save and write clutch pedal programming on Renault EPB vehicles -allows to save clutch pedal programming on Renault vehicles fitted with manual gearbox. After this command is activated, the tool allows to "flash" the electric parking brake unit with the saved clutch data.
Perform control function and reset function on Opel EPB vehicles -allows to apply/release park brake cable service, provide park brake cable service replacement procedures and calibrate the parking brake systems after brake service.
Sensor calibration on Honda EPB vehicles -allows to program the current output value of each sensor into the electric parking brake unit.
Provides parking brake unjam procedure and perform longitudinal accelerometer calibration on Land Rover EPB vehicles -allows to drive the electronic park brake so it is unjamed in the releasing direction and then drive it into mounting position or the latching position; also allows to perform longitudinal accelerometer calibration.
Warning:
EPB systems must be deactivated before carrying out any maintenance/service work on the brakes such as changing of pads, discs and calipers.
Use proper tools to avoid the risk of body injuries of mechanics and technicians and damage to the brake system.
Make sure the vehicle is properly blocked after deactivation of the systems.
- Battery Replacement (BRT)
BRT menu lets you to new battery validated, how to clear faults from the dashboard and display current battery details of the vehicle such as Audi, BMW, Citroen, Peugeot, Seat, Skoda, Volvo, VW, Ford,Infiniti,Jaguar, Land Rover, Lexus,Mini, Mitsubishi,Nissan, Holden, Hyundai, Mzda, Opel, Porsche, Renault, Toyota.
- Diesel Particulate Filter (DPF) Regeneration
DPF Regeneration menu let you perform the DPF cleaning to clear the blockage through continuous burning of the particulates captured in the DPF filter. When a DPF regeneration cycle is completed, the DPF light automatically goes off.
- Throttle Body Alignment (TBA/TPS)
It’s very common to see a customer pull into the shop with a Volkswagen or Audi that just will not idle correctly. One of the possible causes is that the throttle position is not known. When the motion range is not known, the ECU simply has no idea where to set the throttle. The ECU must know the full range of motion of the throttle in order for it to properly control the engine. Using the throttle position sensors in the throttle body, the ECU learns the full open and full closed positions through various states (idle, part throttle, WOT) known as a Throttle Body Alignment (TBA).
- Steering Angle Sensor (SAS) Calibration
SAS Calibration menu let you perform calibration of the Steering Angle Sensor, which permanently stores the current steering wheel position as straight-ahead in the sensor EEPROM. On successful calibration of the sensor, its fault memory is automatically cleared.
- Tire Pressure Monitoring System (TPMS) Programming
TPMS Service menu allows you to check the tire sensor IDs from the vehicle ECU and to perform TPMS programming and reset after tires and/or TPM sensors are replaced and/or tires are rotated.
- Gear Learning
1.Crankshaft position sensor adaptive learning. The crankshaft position sensor learns crankshaft tooth machining tolerance and save to the computer to more accurately diagnose engine misfires. If tooth learning is not performed for a car equipped with Delphi engine, the MIL turns on after the engine is started. The diagnostic device detects the DTC P 1336 'tooth not learned'. In this case, you must the diagnostic device to perform tooth learning for the car. After tooth learning is successful, the MIL turns off. 2.After the engine ECU, crankshaft position sensor, or crankshaft fly wheel is replaced, or the DTC 'tooth not learned' is present, tooth learning must be performed
- CVT
This function is used to reset the compensation code and initialize the ECT after a solenoid valve or valve body assembly has been replaced.
- ODOMETER
This function allows you to revise the date of odometer and write the original date into new odometer.
- INJECTOR CODING
This function is to reset and match the date after injector is replaced.
Foxwell NT650 source:
http://www.foxwelltool.com/wholesale/nt650-automotive-service-reset-scan-tool-obd2-code-reader.html